HOW TO INSTALL PRESETS ON YOUR MOBILE DEVICE
Before we start you will need to download two (free) apps, iZip and Lightroom Mobile, from the app store. iZip will allow you to open the zip folder that holds the presets.
In this tutorial you will learn how to install my presets into the Lightroom Mobile app on your phone. You will be able to save them as presets and apply them with one click.
Step 1: Download the files to your phone
Our mobile presets come as DNG files within a ZIP folder that you can download directly to your phone. Use the app iZip to open the ZIP folder and access the presets. Click to download the file and then tap on Open in iZip:

Step 2: Import the preset files into the Lightroom app
At this point you should have all of your DNG files saved to your phone. These serve as “preset carriers” and now you just need to add them to Lightroom mobile and save them as presets.
Open the Lightroom app and create a new album. In this case we’ll name it “Joshua Tree Presets”:

After opening a new album, tap on the 3 dots in the upper right corner and then tap on Add Photos:

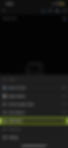
Select From Files and then navigate to iZip files:


Next, select the DNG presets from your iZip files and import them into the newly created album in Lightroom:


Step 3: Create and save your Presets
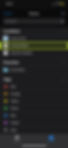
Go into the album containing your newly imported DNG files. Open the first file and tap on the 3 dots icon at the top right of the screen. Now tap on Create Preset:


Next you will see the New Preset screen (shown below) which contains all the options you can use to customize your preset. You can give your preset a name (which I recommend) and add it into a Preset Group in Lightroom. You can save it in User Presets or you can create a new preset group and name it however you like. I recommend this if you plan to have multiple presets from different people and you want to keep them organized and easy to find.
The options below determine which picture settings you’d like to save with this preset. Only the settings you choose here will be applied to the pictures you edit with this preset in the future. I typically check all the boxes except for Tools, Optics and Geometry. Those parameters vary from picture to picture. Typically, you won’t need to crop or tilt exactly the same way for every picture.
When you’re done with the settings save the preset by tapping on the checkmark icon at the top right corner.

Repeat this step for each DNG file as you will need to save each preset separately. Once these are saved you can apply them to your pictures with just one click.
Step 4: Using Lightroom Mobile presets
To use your new presets just go back into your library and open any photo you’d like to edit.
Find the Presets icon in the menu at the bottom of the screen and tap on it. Make sure the Preset Group that’s selected is the one where you saved your new presets. If you saved them in the User Presets group, select that.


Now you can edit the photo by tapping on a preset from the list and then tapping on the checkmark. You can continue to edit the photo and make adjustments if you like, after you’ve applied the preset as each photo reacts to the filter differently. Typically depending on the lighting, I like to adjust the exposure and the contrast and shadows if I feel like the image needs that extra adjustment.